
Let’s be honest — getting a professional bike fit can feel like a luxury. It’s expensive, time-consuming, and sometimes you just don’t have a fit studio nearby. But here’s the thing: your body knows when something’s off. That nagging knee pain after 30 miles? The numb hands on descents? That’s your bike screaming for a tune-up — not your components, but your position.
Enter smartphone motion tracking apps. Yes, your phone — that thing you use for cat videos and grocery lists — can now help you dial in your bike fit. And honestly, it’s surprisingly accurate. We’re talking about apps that use your phone’s camera and sensors to track joint angles, posture, and movement patterns. No lasers required. No $400 fitting fee. Just you, your bike, and a little bit of patience.
Why Motion Tracking Matters More Than You Think
Bike fit isn’t just about comfort — it’s about efficiency. A few degrees off in your knee angle can waste watts. A saddle too high can cause lower back strain. And honestly, most of us ride with some kind of compensation pattern we don’t even notice. Motion tracking apps catch that stuff. They see what your eyes miss.
Think of it like this: you wouldn’t tune a guitar by ear if you had a tuner app, right? Well, your bike fit is the same. Your body’s feedback is valuable, but it’s noisy. Motion tracking gives you objective data. It’s like having a coach who never blinks.
What These Apps Actually Track
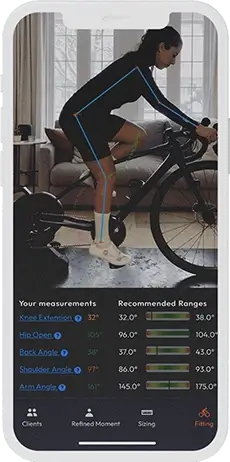
Most bike fit apps — like Bike Fast Fit, Wahoo Fitness (with their new motion capture), or Retül (yes, they have a mobile version now) — use your phone’s camera to record you pedaling. Then they overlay joint markers. You know, little dots on your hip, knee, ankle, shoulder. The app calculates angles in real time or from a video replay.
- Knee extension angle — that’s the big one. Too straight? You’re reaching. Too bent? You’re cramped.
- Hip angle — affects power transfer and lower back strain.
- Spine curvature — are you hunched? Arching? The app sees it.
- Ankle rock — excessive toe-down? That’s a saddle height clue.
Some apps even track your pelvic tilt. That’s a game-changer for aero positions. And they do it all from a tripod-mounted phone. Wild, right?
Setting Up Your Phone for Accurate Tracking
Alright, so here’s the deal — you can’t just prop your phone on a water bottle and hope for the best. You need a stable setup. A tripod or a stack of books works. Place the phone about 6–8 feet away, at hip height. Make sure the background is clutter-free — a blank wall is ideal. Natural light helps, but avoid direct sunlight on the lens.
Wear tight clothing. Loose shorts confuse the app’s AI. And mark your joint points with small stickers or even a marker on your skin. Sounds silly, but it works. The app uses these as reference points. Without them, it’s guessing.
Oh, and one more thing — film from the side. Not front, not back. Side view gives you the clearest sagittal plane data. That’s the plane where all the magic happens.
Common Mistakes People Make (And How to Avoid Them)
Look, I’ve messed this up too. First time I tried an app, I filmed from a low angle — made my legs look like they were pedaling a kids’ bike. So here’s what to avoid:
- Filming in portrait mode — your full body won’t fit. Use landscape.
- Not warming up — your pedaling style changes after 10 minutes. Film after a warm-up.
- Using a moving background — curtains, trees, people walking — they confuse the tracking.
- Ignoring your shoe cleats — your foot position affects everything. Check cleat alignment first.
Honestly, the biggest mistake? Not repeating the test. One video isn’t enough. Do three or four, from different rides. Your body isn’t a machine — it varies. The app gives you a range, not a fixed number.
Interpreting the Data: What Do Those Numbers Mean?
So you’ve got your angles. Now what? Let’s break it down without getting too technical.
| Joint Angle | Ideal Range | If You’re Outside… |
|---|---|---|
| Knee extension at bottom of stroke | 25–35 degrees | Too straight? Lower saddle. Too bent? Raise it. |
| Hip angle (closed) | 55–65 degrees | Too tight? Move saddle back or lower. Too open? Slide forward. |
| Ankle angle at top of pedal stroke | 90–100 degrees | Excessive dorsiflexion? Check cleat position. |
| Spine angle (relative to horizontal) | 40–50 degrees (road) 50–60 degrees (gravel) | Too flat? You might be overreaching. Too upright? Aero drag increases. |
But here’s the nuance — these are guidelines, not laws. Your flexibility, injury history, and riding style matter. A time trialist will have a flatter back. A commuter might be more upright. The app gives you a baseline. You decide what feels right.
Making Adjustments Without Losing Your Mind
Start with one change at a time. Seriously. Don’t move your saddle, swap your stem, and adjust cleats all in one session. You won’t know what worked. Change saddle height by 2–3 mm, ride for a week, then re-film. Let your body adapt.
I once dropped my saddle 5 mm based on an app reading — and my knee pain vanished in two rides. But I’ve also seen people chase numbers and end up worse. Trust the data, but trust your body more. The app is a mirror, not a prescription.
Are These Apps Worth It? A Real Talk
Sure, they’re not perfect. They can’t measure your flexibility or account for your unique biomechanics. And they rely on 2D video, which means they miss some rotational stuff. But for 90% of riders, they’re more than enough. In fact, a 2023 study from the Journal of Sports Sciences found that smartphone-based motion tracking was within 2–3 degrees of professional motion capture systems for knee and hip angles. That’s impressive for a device in your pocket.
The real value? You can track changes over time. After a new saddle? Re-film. After a bike fit session? Re-film. After a long off-season? Re-film. It’s like having a progress log for your position. And that’s something even a pro fitter can’t give you — continuous feedback.
Which Apps Should You Try?
There’s no one-size-fits-all. But here’s a quick rundown:
- Bike Fast Fit — user-friendly, great for beginners. Free version works fine.
- Wahoo Fitness (with motion capture) — integrates with sensors. More advanced.
- Retül (mobile) — professional-grade, but pricier. Worth it for serious riders.
- MyFitness (free) — basic but does the job. Good for quick checks.
Honestly, start with a free one. See if you like the process. You can always upgrade later.
The Bottom Line
Bike fit optimization doesn’t have to be a mystery — or a budget breaker. Smartphone motion tracking apps put the power back in your hands. Or, well, in your pocket. They’re not a replacement for a skilled fitter, especially if you have injuries or complex needs. But for the daily rider, the weekend warrior, the gravel grinder? They’re a revelation.
So grab your phone, set up a tripod, and take a hard look at your pedal stroke. You might be surprised what you find. And honestly — your knees will thank you.


